[How-to Tuesday] RPG “Dungeon” Style Base
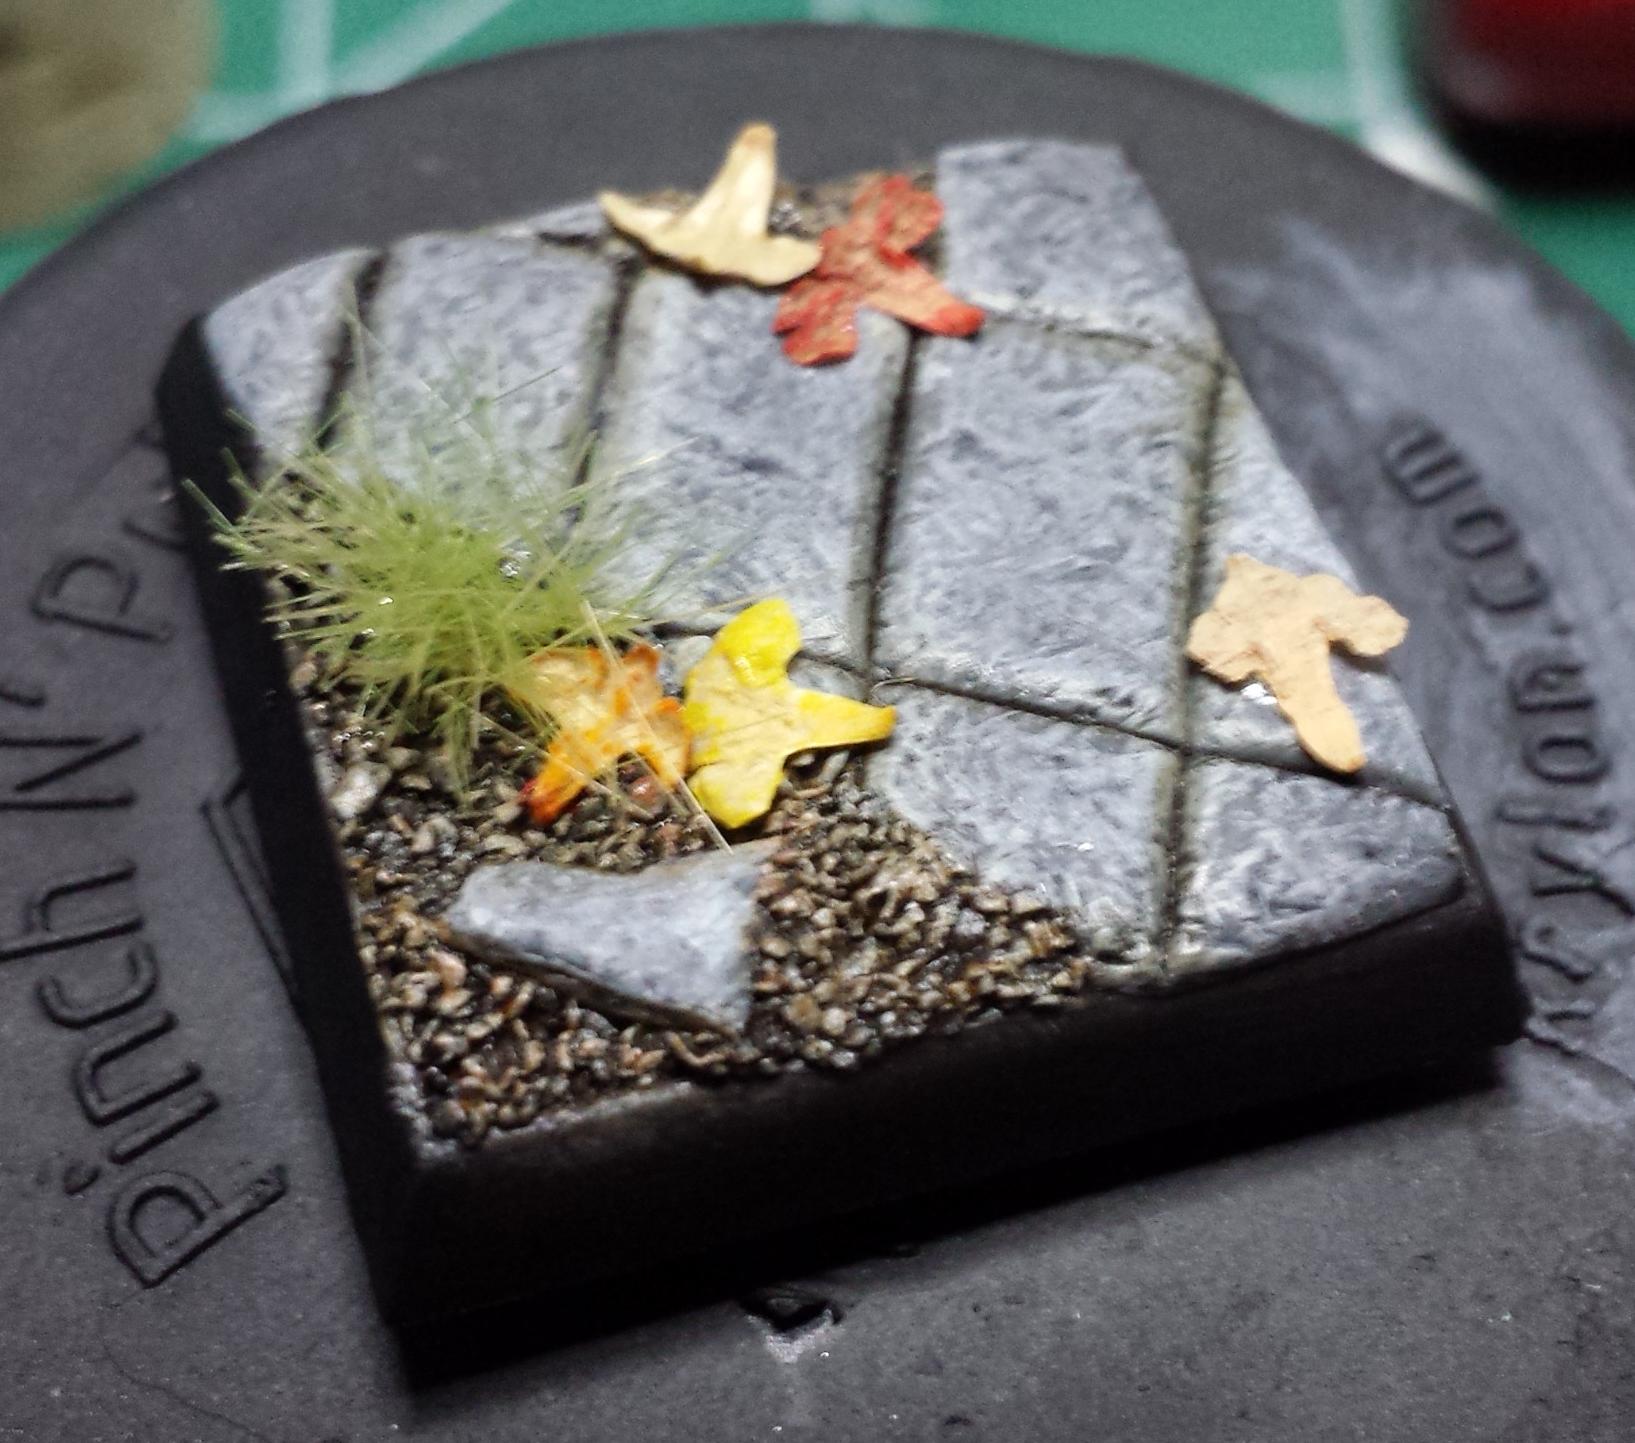
For Velmarius, I’m trying to appeal to the gamer crows as well as the show piece crowd, so I need a base that both looks good and is visually interesting, and that’s practical for use in a game. Thus, I’m going to use the 1-inch square base that the model came with, and I’m going to base it in a dungeon floor type theme.

I start by quickly start by whipping up a decent size ball of green stuff. I want some rubble and dirt on part of thebase, so I can put in a shrub or something, so I only cover 3/4 of it.

I drip a couple drops of water from my painting cup onto the green stuff so nothing will stick to it.

Then, I grab a thick piece of plasti-card and use it to flatten the green stuff. I’m left with a nice, flat surface. I then ruin that nice flat surface by rolling around a ball of aluminum foil all over the base. This gives it lots of cool texture.


I then dip my hobby knife into my water and carefully cut lines in the green stuff, making bricks. I do this by just pressing the blade into the putty – I don’t draw the blade through or anything, just press it in and pop it back out.

I hit the putty with the aluminum foil ball again, just to rough up the nice straight lines I just made.

Using my clay shapers and hard tools, I roughed up the odd edge of the stone so it would look broken.

Then, I cut out one of the small back stones and moved out front, to be a broken part of one of the others, and give me a visually interesting missing stone in back.

Sand.

Black paint to start with, followed by a deep brown. I’m using craft paints here, not P3 paints.

Then a dark grey for the stones.

Two intermediate greys via drybrushing bring out the texture. All of my pictures of this stage are blury, so on we go. A quick drybrush of the dirt with an orangish brown called “raw sienna”, followed by a bone color. Then, a wash with Secret Weapon Dark Sepia in the dirt and along the seams of the stone. Add in a handful of Secret Weapon Autumn Leaf Scatter and a little grassy shrub thanks to Army Painter’s “Jungle Tuft”, and viola:

Lastly, the model is mounted via the two pins in the feet, and off we go!


Nice tutorial. I really like that you answer the most common questions (materials products colors ) in the tutorial. The free hand on the cloak I think will encourage people to add a buck when they tie for your auction. 🙂 good luck !
I hope so, thanks!
Nice! The base Tutorial was very informative and has inspired me to work on my non-existent green stuff skills. The eyes and freehand on your model are great! So where do you get that rubber end brush like tool that you use for sculpting? I can never remember what it is called and have been looking for one for ever. Thanks.
They are called “clay shapers”, and I have them in my Amazon store up top, under Hobby Tools. I suggest the size 0 ones.
Thank you!
You, sir.
this is great. I have a whole box of Bones minis that are going to need baseing, and this looks to be perfect for it!
Awesome, I can’t wait to see how they turn out!
freehand looks great. subtle but still enhancing the backside of the model quite a bit in my opinion. what I really like to do, to break up the monotony of stone bricks on the ground is to put a couple subtle layers of purpe, blue, red glazes over different stones just to give em some faint touch of color. just a quick sugestion but I really like the little leafes on the base. hope you get a nice price for him.
Love the base tutorial, always looking for ways to add texture to my green stuff.
Great write-up, I going to use this for my Chibi Mythos when they arrive later this year once Impacts kickstarter is funded.
Just after reading this tutorial, I saw another on the PP terrain section that suggesting using a real rock to impress texture on foam insulation. Now… do I have aluminum foil somewhere….