Fun with Laserz
One of the biggest problems I seem to be having in my WM / H games is determining if models have LOS to another. Be it spell slinging, gunfire or determining cover / concealment bonuses, LOS is a major factor in our games. To check LOS, one must lay a straight edge on the table to be able to physically check if a line can be drawn between bases. The most common straight edge available to me is usually my tape measure, and I definitely don’t want to use that.
Why? Read this. The second most often seen cheat is measurement shenanigans.
To avoid this, I decided to build a line laser. It’s a special type of laser pointer that draws a line on the surface you point it at. They’re most commonly used in laser levels for hanging pictures on walls. If I had one of those line lasers in my pocket, I could slap a straight edge on the table and check LOS without any fear of pre-measuring! Sweet.
So, I bought a $5 red line laser module off eBay, and used a $3 flashlight similar to these.
After testing the laser module at work, I took it home and tore apart the flashlight. Here’s what was inside:

There’s 3x AAA batteries, a battery cartidge, a large spring, a casing, an end with a button in it, a small circuit board with the 9 LEDs and a small spring on the back, a reflector with 9 holes in it for the LEDs, a clear lens, a retaining ring (which had to be unscrewed to get the LEDs out) and the big bulbous end that all the stuff goes into. Oh, and the laser module.
 First order of business: making it work with one less battery. The flash light uses 3x 1.5V AAA batteries in series, producing 4.5V. The laser module runs on 3V. Thus, if we remove one battery, we have 1.5 x 2 = 3V! So, I took some spare brass tube and cut it to just a hair longer than the length of a battery:
 I then crushed one end of it with a set of small pliers. I wanted the crushed end to sort of form a cone.
Meh, good enough. The reason for this is that this rod will replace a battery in the battery cartridge. Since my tube was almost as big as one of the springs that applies pressure on the battery, I figured it would be easier to have it ride inside the smallest part of the spring.
 I stuck the smushed end of the rod into one of the battery cartridge slots and then snapped the rod into place. The non spring end of the cartridge had an embossed ring, likely to help capture the nub on the end of the battery. The rod fit into that perfectly.
Now, I needed to figure out how to attach the laser module.
 Flashlights tend to use the metal chassis of the flashlight as ground, or the negative end of the battery. Since the big spring is part of that connection (connects the body with the LED circuit board, I could solder to the spring.for my negative side. Any part of the spring will do, but the narrow part where the wire that makes up the spring ends, right up next to the coil is the best. Solder will wick right into that narrow space and stay put.
I then scratched up the contact on the “+” side of the battery cartridge with my hobby knife and put a small puddle of solder there
Red to +, black to the spring, and the soldering was done!

At this point I was able to stuff everything into the flashlight and confirm my circuit worked. So, all I had to do was somehow mount the LED module into the tip securely. It won’t be an effective tool of the LED module is all wiggly and unsteady.
I found out that a 23/64″ drill bit is 9.1mm in diameter. Since my LED module was 9mm in diamater, this was the drill bit for me. I used the silver reflector from the flashlight and used the middle hole as a pilot hole. Some slow hand drilling later (so I didn’t crack the plastic) and …

Putting it all together, and…

It works like a charm! It seems to have the thinnest line at about a meter away, which is perfect for the tabletop. Since it runs on two AA batteries, it’ll be easy to keep it running.
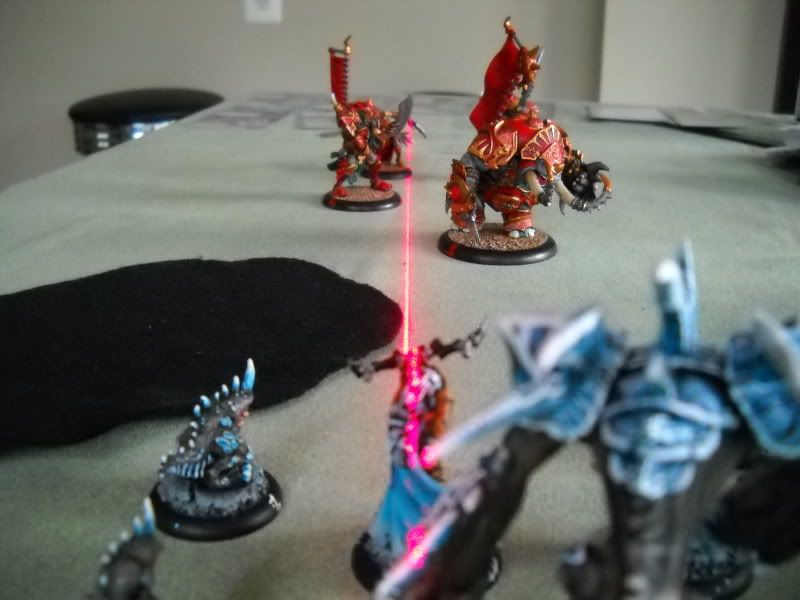 |
| Lylyth has LOS to Morghoul, despite his best efforts… |
great article, have to build me one of those!
I want a laser!
very nice Brandon! taking orders for em' yet? lol
I have yet to use it, but I think it'll be a good tool when the need arises.
If you want me to make you one, send me an e-mail and maybe we'll work something out… 😀
It came in very handy during that 6-player game we played! Must. Have. One. MustsuckuptoBrandon. 🙂
Thank you for the info. It sounds pretty user friendly. I guess I’ll pick one up for fun. thank u.
Line Lasers